Month: August 2017

  • Blog
  • Month: August 2017

Migrate the SugarCRM to AWS(Amazon Web Service) server (Part I)

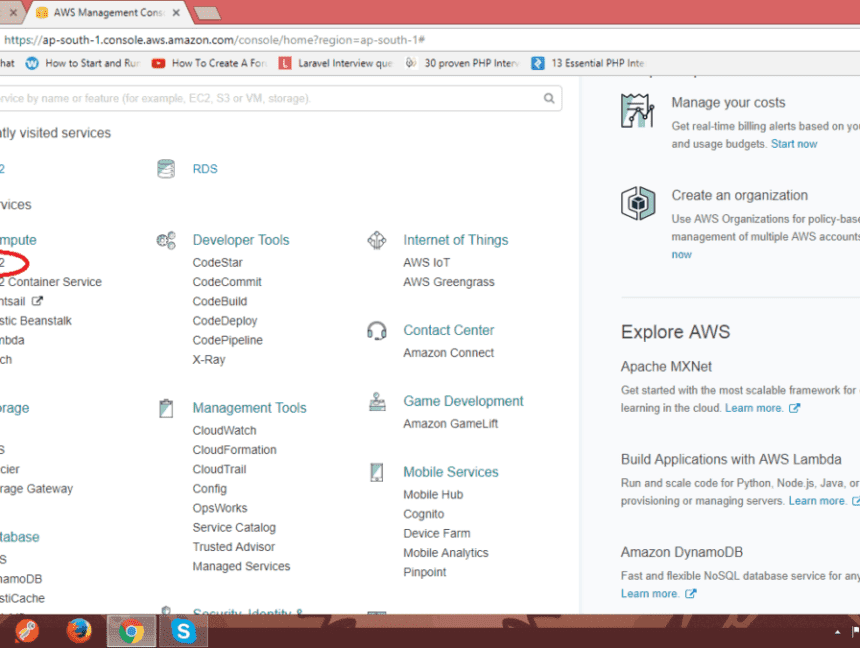
Migrate the SugarCRM to AWS(Amazon Web Service) server (Part I) To Migrate SugarCRM to AWS server first we have to create an instance of the production/test server and a database server instance on AWS server. So we will see the same step by step. Create Basic AWS EC2 On-Demand instances : Login to Amazon console. Go to All Service -> Compute -> ECS2   Click Launch Instance.   Choose AMI (Amazon Machine Image): Here we choose the operating system of the server instance. I choose the Ubuntu Server. Anyone can choose other option as per the needs.   Choose Instance Type: Select the instance type as per requirement. There is the range of types of the instance which varies in the cost as well as in terms of the performance. Here we are selecting t2 micro. You can change the instance type in future.    See Charges using AWS Calculator. Configure Instance: Here we don’t have to do any changes. Simply move to the next step to add storage. If any changes are needed, do it carefully.   Add Storage: Specify the size of storage you need, it will be allocated the respective server instance. Select the volume type > General Purpose (SSD).   Add Tags: Here no need to do anything. Simply move to next step.   Configure Security Group Add Rule for SSH, Mysql, https, HTTP, SMTP, SMTP, etc. Here if you are not sure about the rules just add All Traffic option from the drop down. Later you can alter the security groups as per the needs.   Review & Launch Create Server then Generate and save .pem file. (Keep Backup of .pem file it will be required for logging in to server using WinSCP which we will see in Part II).   Go to EC2 -> Instance Here you can see that new instance is being initialized.   Add Elastic IP: Go to EC2 Dashboard -> Elastic IPs -> Allocate New Address We don’t have to do anything click on Allocate button and it will automatically assign an elastic IP.   Associate Address: After this, we have to associate the address with elastic IP. Select the instance and the click on the Associate address in Actions. Select Instance and Private IP then click Associate. Goto ES2 Dashboard -> Instance Check the status of the new instance. If it is “running“. Basic AWS EC2 instance is ready to use.   Create RDS (Relational Database Server) Instance  Go to Services -> Database -> RDS   Launch a DB Instance   Select Engine As we are using the MySQL Database so select the database engine. Select database engine as per the needs. Select MySQL -> MySQL Community Edition   Do you plan to use this database for production purpose or testing? Select Production or Dev/Test according to requirement. Then Press Next.   Specify DB Details Select DB Instance : db.t2.micro Storage Type: General Purpose (SSD) Allocated Storage: 15 GB (As per the requirement) DB Instance Identifier (MySQL server instance name) Master Username (DB Username eg. root) Master Password (DB password) Confirm Password (DB password) (Note down this password, it will be used in later MySQL configuration.)   Configure Advanced Settings Database Name: (DB name)   Launch DB Instance.  Basic RDS instance is ready to use. Go to RDS -> Instance and you can see that new database instance is being created. After the instance is activated, it is ready to use. Above red marked is the database host address which you will need later, to restore the database.  This is the first part of Migrate SugarCRM to AWS. Further, we have to install LAMP on the production server which includes Linux, Apache, MySQL, PHP. We also have to configure Apache. As well as we have to dump the database of SugarCRM on the new database server. We will see it in Part II. If any queries, please contact us here.

SugarCRM Load Testing using Jmeter

What is SugarCRM  and Why SugarCRM Load Testing is must? SugarCRM is the world’s largest open source CRM (customer relationship management) software. These custom business applications can be used in a multitude of ways, such as to power sales teams, run customer support organizations, and manage customer information databases.With the passage of time, the data in SugarCRM increases significantly and load on hosting server start increasing resulting into decreased performance making SugarCRM Load Testing a must to do task.   Why we Use Jmeter for SugarCRM Load Testing? Performance Testing is crucial to determine that the web application under test will satisfy high load requirements. It can be used to analyze overall server performance under heavy load.Jmeter is the best tool to complete sugarcrm load testing.   JMeter offers the following benefit in Performance testing: JMeter can be used to test the performance of both static resources such as JavaScript and HTML, as well as dynamic resources, such as JSP, Servlets, and AJAX. JMeter can discover maximum number of concurrent users that your website can handle JMeter provides a variety of graphical analyses of performance reports. JMeter Performance Testing includes: Load Testing: Modeling the expected usage by simulating multiple user access the Web services concurrently. Stress Testing: Every web server has a maximum load capacity. When the load goes beyond the limit, the web server start responding slowly and produce errors. The purpose of the stress testing is to find the maximum load the web server can handle. How to do Load Testing Of SugarCRM ? By using the Recording Controller we can easily record the Test script and use it for the load testing. Step 1: Need below software Apache JMeter – Download and run the .bat/.sh file from the bin folder. (.bat for window & .sh for Linux) Java  – Download and proper installation of Java. Mozilla Firefox – Download and proper installation of Mozilla. Step 2: Run the .bat file from the bin folder. Step 3: Build a test plan Add the Thread Group to Test Plan – Right-click on Test Plan > Add > Threads (Users)> Add > Thread Group You can also rename your Test Plan , Thread users and Thread Group Step 4: Add HTTP Request Defaults Right-Click on Thread Group –> Add–> Config Elements –> HTTP Request Defaults We are added the HTTP Request Defaults causes we will send the multiple requests to the same web server HTTP Request Defaults contain the two important parts- Server Name or IP Port Number   Server Name or IP: Enter the url or IP address of the site on which you want to perform the load testing.( Here I am using Server Name : crm.ihealthassist.in) Port Number: Enter the default port number 8888. Step 5: Add the HTTP Cookie Manager Right Click on Thread Group –> Add–> Config Elements –> HTTP Cookie Manager After selecting HTTP Cookie Manager make changes in Cookie Policy by selecting Compatibility option. Step 6: Add the Recording Controller Right-click on Thread Group > Add > Logic controller > Recording Controller Step 7: Add HTTP Test Script Recorder  Right Click on Workbench–> Add–> Non-Test Elements –> HTTP Test Script Recorder. Target Controller:  Add the place where you want to record the script. Here we choose –use recording controller. Step 8: Setting of the browser proxy Open Firefox Browser. Click on Tools shown at the top menu. Click on Options shown below Click on Advance shown on the window after clicking Options. Click on Network tab shown on the window after clicking Advance. Click on Settings Button. Click on Manual proxy configuration Enter localhost and Port 8888. Click ok button. Step 9: Now Record the Script When you click on the start button on the HTTP(S) Test Script Recorder then the below screen is appeared Click on the ok button.    Now enter the URL in the browser and navigate the screen according to you. Here we use “ http://crm.ihealthassist.in/index.php?module=Users&action=Login“ for load testing. After completion, the navigation stops the recording from the HTTP Test Script Recorder. Step 10: Add the Listener As we can use many listeners in same test plan but here we are using View Results Tree Step 11: Now save the Test Plan Click on File-> Save \ Name the test plan and save test plan in any location where you want to store your Test plan Step 12: Now Run the Test Plan By simply clicking on button which is shown below, we can easily run our Test Pan Step 12: After completed the process check the result-   Still Finding it Difficult Watch Our Video for more clarification To further understand SugarCRM Load Testing or to outsourceSugarCRM load testing you can always contact us here.

Free SSL for SugarCRM and other websites

Why SSL is must for SugarCRM ? SugarCRM or any other crm store vital information about Customer, leaking this data to hacker can pose a very serious problem for Companies. To avoid this best way to secure your website is setup a SSL for SugarCRM instance and domain, This article explains how to setup Free SSL for SugarCRM. How to Setup Free SSL for SugarCRM Using following steps it is very easy to get Free SSL for SugarCRM and other websites: 1) Go to Website https://www.sslforfree.com/ SSL for Free uses Let’s Encrypt, It’s a free and open Certificate Authority. 2) Enter your website URL and click Create Free SSL Certificate 3) Click on Manual Verification, Then on Manually Verify Domain 4) Download verification file by clicking on given link 5) Upload verification files to server We can upload to home directory of user using WinSCP then copy to .well-known/acme-challenge directory using Putty (or similar utility) We can do this by following commands: cd /var/www/html/blogs/techaroha_wordpress/techaroha/Application/crm sudo mkdir .well-known sudo mkdir .well-known/acme-challenge cd .well-known/acme-challenge sudo cp /home/ubuntu/8KwHBt7R-Hj_ajYy8KdrVMjO7hmDaEgEcWbwkywvBCQ ./ sudo cp /home/ubuntu/P0yc76hR-l7KAoTf84LzoYVgf1d8XPTgPsSsMnZjzdw ./ 6) You can check verification files are properly uploaded by clicking on given links If it shows error like file not found check that you have uploaded to proper directory and directory is accessible 7) If file verification links works properly click Download SSL Certificate 8) Now Click Download All SSL Certificate Files to download all certificate files in a zip package 9) Now Copy certificates to /etc/ssl/certs in your server You can copy and save certificate files individually directly to server using these command cd /etc/ssl/certs sudo mkdir www.techaroha.com cd www.techaroha.com sudo vim www.techaroha.com.crt (press i and paste certificate content, press esc key, then :wq to save) sudo vim www.techaroha.com.key (press i and paste Private Key content, press esc key, then :wq to save) sudo vim www.techaroha.com.ca-bundle (press i and paste CA Bundle content, press esc key, then :wq to save) To generate CSR from certificate use following command sudo openssl x509 -in yourDomainName.crt -signkey yourDomainName.key -out yourDomainName.csr 10) Configure apache to use ssl Edit your websites apache config file using following commands cd /etc/apache2/sites-avilability sudo vim techaroha.conf ( add these lines and make appropriate changes and save) <VirtualHost *:443>ServerName www.techaroha.comServerAdmin webmaster@techaroha.comServerAlias www.techaroha.comDocumentRoot /var/www/html/blogs/techaroha_wordpress/techaroha/Application/crmErrorLog ${APACHE_LOG_DIR}/error.logCustomLog ${APACHE_LOG_DIR}/access.log combinedSSLEngine onSSLCertificateKeyFile /etc/ssl/certs/www.techaroha.com/www.techaroha.com.keySSLCertificateFile /etc/ssl/certs/www.techaroha.com/www.techaroha.com.crtSSLCertificateChainFile /etc/ssl/certs/www.techaroha.com/www.techaroha.com.ca-bundle</VirtualHost> Enable ssl and restart apache service sudo a2enmod ssl sudo service apache2 restart Now Visit http://52.66.6.159/testblog and check if there is any certificate error. If you want your website to force https you have to make change in .htaccess RewriteEngine On RewriteCond %{SERVER_PORT} 80 RewriteRule ^(.*)$ http://52.66.6.159/testblog/$1 [R,L] (add above lines to existing .htaccess file in your public directory or create a new file) Enable mod rewrite and restart apache service sudo a2enmod rewrite sudo service apache2 restart visit http://52.66.6.159/testblog and test it should redirect to http://52.66.6.159/testblog,If you need any help you can always contact here

Configure Eclipse with Selenium WebDriver for SugarCRM Automation Testing

Why Selenium used for SugarCRM Automation Testing? Sugar CRM is Customer Relationship Management software it widely use by client as per their requirements So, customer works on different scenarios, automation  helps to reduce testing time so, tester can cover no. of scenarios Selenium Webdriver is Open Source Software testing tool which is compatible with different browsers. To create your test cases selenium support many languages but, Most popular is JAVA to prepare automation test Cases with Selenium WebDriver. How to configure Eclipse with Selenium WebDriver? Let’s Start to Install Selenium WebDriver in Eclipse Step 1 :  Download and Install New version of Java Development Kit (JDK). NOTE : JDK has already include Java Runtime Environment (JRE) So, No need to install JRE separately. Link to Download : http://www.oracle.com/technetwork/java/javase/downloads/index.html Step 2 : Install Eclipse IDE Now download “Eclipse IDE for Selenium”. location: http://www.eclipse.org/downloads/ Make sure to choose link for downloading eclipse which corresponds to your Operating System like for Windows 32 Bit and 64 Bit Versions. You should download a Zip file, inside ZIP file , there is an “eclipse” folder which has all the application file, We can extract the “eclipse” folder anywhere in your PC. Step 3 : Download Selenium  Java Client Driver You can download the Selenium Java Client Driver from this location:http://docs.seleniumhq.org/download/ Click on Download link for java release. Download the jar files. You will get client drivers for other languages there, but choose the one for Java as shown above in the screenshot. After downloading you will get a folder which should contain two jar files related to selenium, a “lib” folder which also contains jar files inside it. Beside this, there is a change log file as well. Refer to the screenshot below. Create a new folder with name say ‘Selenium’ in C drive and extract the jar files to ‘Selenium’ folder. Step 4: Download Chrome WebDriver Selenium WebDriver support for many Browsers such as Mozilla, Chrome, Opera ,etc., To download any of WebDriver  you should click on Browser link’ Click on Download link -> Click on “Latest Release : ChromeDriver 2.31” ->Click on Chromedriver_win32.zip (for Windows) , Make sure to clink link you want to download it for Windows, Linux or mac version After downloading Create folder for chrome Driver and extract  “ChromeDriver 2.31.exe” to created folder  Step 5 : Create a New Project in Eclipse Navigate to C drive and open eclipse folder where we have extracted all the application files related to eclipse. In eclipse folder you would get a ‘eclipse.exe’ file. Click on the .exe file This would ask you to select a workspace, you may accept the default location or simply create a new workspace inside C drive and confirm OK. Create a new project and for creating click on File Menu -> New -> Java Project -> Name the Project as “testproject” and click finish. Create a new Java Class, for doing this again click on File Menu -> New ->Class then name it as “testclass” and select the checkbox for ‘public static void main(String[] arg)’ and click finish. your Eclipse IDE should look like the image below Add Selenium .JAR files in  project  Now Right-click on “testProject” and select Properties. On the Properties window, click on “Java Build Path”. Click on the Libraries tab, and then click “Add External JARs..” Navigate to C:\selenium 3.4 (or any other location where you saved the extracted contents of “selenium 3.4.0.zip” in step 3). Add all the JAR files inside and outside the “libs” folder. Your Properties window after adding all the jar file should  now look similar to the image below. Finally, click OK and we have completed importing Selenium libraries into our project. Step 6 : Write code for Login SugarCRM import org.openqa.selenium.*; import org.openqa.selenium.chrome.ChromeDriver; import org.openqa.selenium.chrome.ChromeOptions; public class testClass { public static void main(String[] args) throws Exception {   System.out.println(“launching chrome browser”);         //Use in Chrome browser     System.setProperty(“webdriver.chrome.driver”,”E:\\Project_Work\\Selenium\\selenium 3.4\\chromewebsriver 2.30win-32\\chromedriver.exe”); ChromeOptions options = new ChromeOptions();     //Arguments added to ignore other notifications an disable extensions options.addArguments(“–disable-extensions”,”–test-type”); WebDriver driver = new ChromeDriver(options);     driver.manage().window().maximize();     //Open Sugarcrm  Development Login Sugar CRM driver.get(“http://crm.ihealthassist.in”);     driver.findElement(By.id(“user_name”)).sendKeys(new String[] { “admin” }); driver.findElement(By.id(“user_password”)).sendKeys(new String[] { “admin@123” }); Thread.sleep(1000); driver.findElement(By.id(“login_button”)).click(); Thread.sleep(2000); System.out.println(“System Logged-in”); } } Please see the below video to see how to configure Selenium on Eclipse for Sugar CRM                                                                                                                                                      For more details for implementing Automation Testing for SugarCRM please contact here.