
Why Selenium used for SugarCRM Automation Testing? Sugar CRM is Customer Relationship Management software it widely use by client as per their requirements So, customer works on different scenarios, automation helps to reduce testing time so, tester can cover no. of scenarios Selenium Webdriver is Open Source Software testing tool which is compatible with different browsers. To create your test cases selenium support many languages but, Most popular is JAVA to prepare automation test Cases with Selenium WebDriver. How to configure Eclipse with Selenium WebDriver? Let’s Start to Install Selenium WebDriver in Eclipse Step 1 : Download and Install New version of Java Development Kit (JDK). NOTE : JDK has already include Java Runtime Environment (JRE) So, No need to install JRE separately. Link to Download : http://www.oracle.com/technetwork/java/javase/downloads/index.html Step 2 : Install Eclipse IDE Now download “Eclipse IDE for Selenium”. location: http://www.eclipse.org/downloads/ Make sure to choose link for downloading eclipse which corresponds to your Operating System like for Windows 32 Bit and 64 Bit Versions. You should download a Zip file, inside ZIP file , there is an “eclipse” folder which has all the application file, We can extract the “eclipse” folder anywhere in your PC. Step 3 : Download Selenium Java Client Driver You can download the Selenium Java Client Driver from this location:http://docs.seleniumhq.org/download/ Click on Download link for java release. Download the jar files. You will get client drivers for other languages there, but choose the one for Java as shown above in the screenshot. After downloading you will get a folder which should contain two jar files related to selenium, a “lib” folder which also contains jar files inside it. Beside this, there is a change log file as well. Refer to the screenshot below. Create a new folder with name say ‘Selenium’ in C drive and extract the jar files to ‘Selenium’ folder. Step 4: Download Chrome WebDriver Selenium WebDriver support for many Browsers such as Mozilla, Chrome, Opera ,etc., To download any of WebDriver you should click on Browser link’ Click on Download link -> Click on “Latest Release : ChromeDriver 2.31” ->Click on Chromedriver_win32.zip (for Windows) , Make sure to clink link you want to download it for Windows, Linux or mac version After downloading Create folder for chrome Driver and extract “ChromeDriver 2.31.exe” to created folder Step 5 : Create a New Project in Eclipse Navigate to C drive and open eclipse folder where we have extracted all the application files related to eclipse. In eclipse folder you would get a ‘eclipse.exe’ file. Click on the .exe file This would ask you to select a workspace, you may accept the default location or simply create a new workspace inside C drive and confirm OK. Create a new project and for creating click on File Menu -> New -> Java Project -> Name the Project as “testproject” and click finish. Create a new Java Class, for doing this again click on File Menu -> New ->Class then name it as “testclass” and select the checkbox for ‘public static void main(String[] arg)’ and click finish. your Eclipse IDE should look like the image below Add Selenium .JAR files in project Now Right-click on “testProject” and select Properties. On the Properties window, click on “Java Build Path”. Click on the Libraries tab, and then click “Add External JARs..” Navigate to C:\selenium 3.4 (or any other location where you saved the extracted contents of “selenium 3.4.0.zip” in step 3). Add all the JAR files inside and outside the “libs” folder. Your Properties window after adding all the jar file should now look similar to the image below. Finally, click OK and we have completed importing Selenium libraries into our project. Step 6 : Write code for Login SugarCRM import org.openqa.selenium.*; import org.openqa.selenium.chrome.ChromeDriver; import org.openqa.selenium.chrome.ChromeOptions; public class testClass { public static void main(String[] args) throws Exception { System.out.println(“launching chrome browser”); //Use in Chrome browser System.setProperty(“webdriver.chrome.driver”,”E:\\Project_Work\\Selenium\\selenium 3.4\\chromewebsriver 2.30win-32\\chromedriver.exe”); ChromeOptions options = new ChromeOptions(); //Arguments added to ignore other notifications an disable extensions options.addArguments(“–disable-extensions”,”–test-type”); WebDriver driver = new ChromeDriver(options); driver.manage().window().maximize(); //Open Sugarcrm Development Login Sugar CRM driver.get(“http://crm.ihealthassist.in”); driver.findElement(By.id(“user_name”)).sendKeys(new String[] { “admin” }); driver.findElement(By.id(“user_password”)).sendKeys(new String[] { “admin@123” }); Thread.sleep(1000); driver.findElement(By.id(“login_button”)).click(); Thread.sleep(2000); System.out.println(“System Logged-in”); } } Please see the below video to see how to configure Selenium on Eclipse for Sugar CRM For more details for implementing Automation Testing for SugarCRM please contact here.
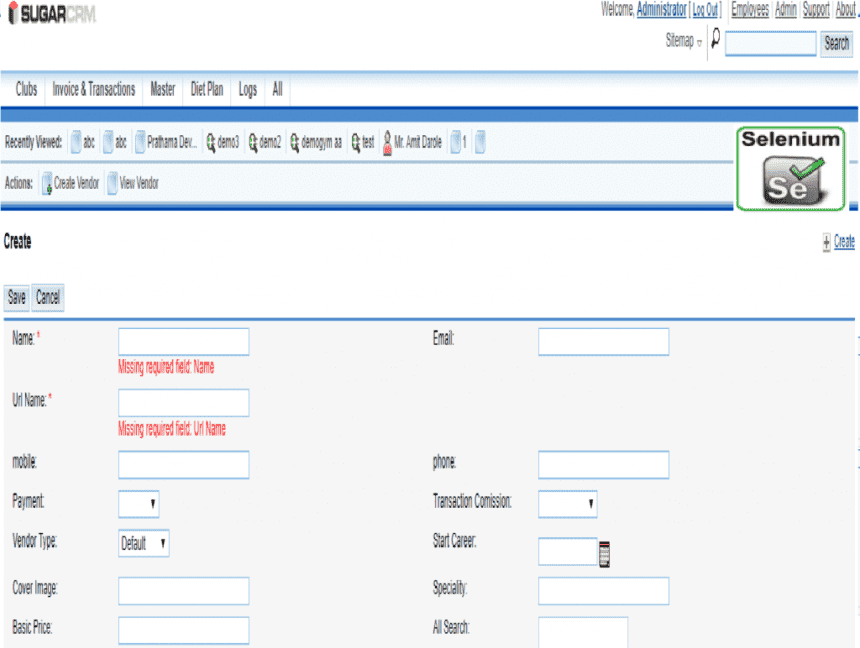
Why is SugarCRM Automation Testing Required? Every growing company needs CRM and they customize it according to the requirement for their business.CRM needs changes with the market and technical/testing team has to keep up themselves with the market. Generally, SugarCRM system is vast and manage many things other than customer relationship. In such scenario tester’s and quality control professional find it difficult to decide what to test and what not. Testing everything from the start will consume too much time increasing the cost of the product , if testers leave something untested it may lead to the quality issue. The only solution to this problem is to automate the testing and implement SugarCRM Automation Testing. How ? In Automation, Selenium is the best tool for Testing sugar CRM Here, We can access all elements and operate for testing dynamically. Validation is the process to evaluate sugarCRM quality and development phase.So, I have to find all required elements and compare Actual result to Expected Result. For, Quality check I use Chrome Driver, Chrome users are increases frequently, still, we also can use Firefox Driver. System.setProperty(“webdriver.chrome.driver”,”E:\\Driver\\chromedriver.exe”); ChromeOptions options = new ChromeOptions(); While Testing browser should disable other Extensions for automation Tool options.addArguments(“–disable-extensions”,”–test-type”); WebDriver driver = new ChromeDriver(options); Login SugarCRM using selectors id, driver.get(“http://crm.ihealthassist.in”); driver.findElement(By.id(“user_name”)).sendKeys(new String[] {“username”}); driver.findElement(By.id(“user_password”)).sendKeys(new String[]{“password”}); driver.findElement(By.id(“login_button”)).click(); When searching for Element in form, driver expires the session until element has been found, But timeout expires before throwing a NoSuchElementException and increasing the implicit wait timeout. driver.findElement(By.xpath(“//*[@id=’moduleTab_0_Vendor’]”)).click(); driver.manage().timeouts().implicitlyWait(10,TimeUnit.SECONDS) ; driver.findElement(By.id(“create_link”)).click(); driver.manage().timeouts().implicitlyWait(10,TimeUnit.SECONDS); For Validation Assertion compare both expected and Actual Result, Here, I have used “SoftAssert” because it continue with sequence even after an assertion fails in the sequence //Validate Using Assertion SoftAssert softAssert = new SoftAssert(); softAssert.assertEquals(Name_err_msg,”Missing required field: Name”); softAssert.assertEquals(Url_Name_err_msg,”Missing required field: Url Name”); softAssert.assertAll(); Please see the below video to see how SugarCRM Automation Testing works For more details for implementing Automation Testing for SugarCRM please contact here.
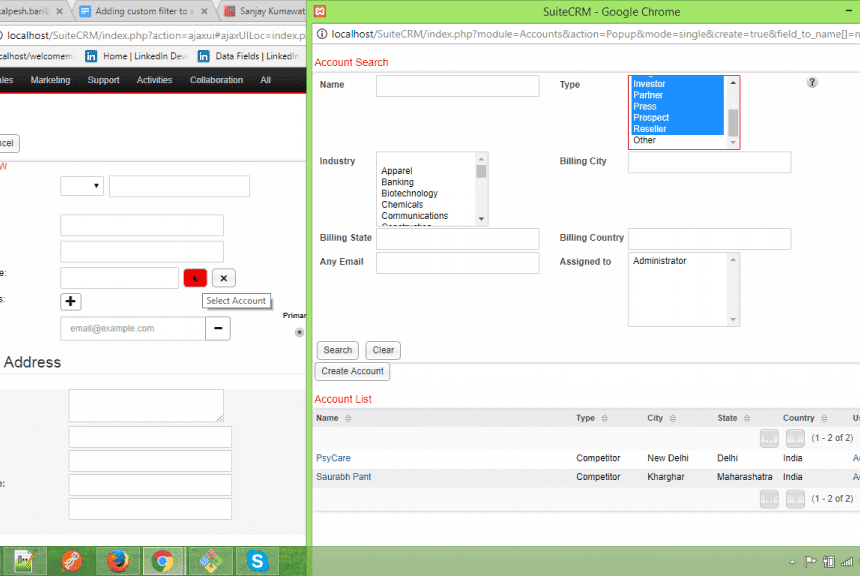
Applying filter in SugarCRM on the pop-up view results of a relate/relationship field. Why SugarCRM PopUp Filter? While working in SugarCRM, many times we get the unnecessary records in relate field pop up view. Sometimes, we have to filter the records manually as per our need. It’s better to filter those records at the back-end as per system requirement and get the relevant records only. So avoiding hectic job of manual searching. Let’s see how SugarCRM PopuP Filter is being implemented. How ? It’s simple, here is the answer. For example, Add a filter in Account pop up view on From the SugarCRM Admin Panel, accessing the Studio or Module Builder, we can add the fields in the pop up the search. Suppose we want to add a field Industry in search fields of Accounts module pop up view. Step 1. Go to the admin panel. Step 2. Go to the studio. Step 3. Select the module Accounts. Step 4. Select “Layouts” option. Step 5. Select “Pop-up view”. Step 6. Select “Popup Search”. Step 7. Drag the field “Industry” from the column Hidden and drop in “Default” column. This is how anyone can add the fields in the pop up the search as per the requirements. Going further now we want to use that field to filter the records in the pop view. Only the records having Industry as “Consulting” should be listed in the pop-up view. To perform this functionality at the back-end, we have to work on the pop-up view of Accounts module. As per the standard practice, we will do it in “Custom/modules/Accounts/views/” directory. In views folder, you can see the file “view.popup.php”. If it is not there, create a PHP file with the same name. If you create a new file add the code given below: require_once (‘include/MVC/View/views/view.popup.php’); class AccountsViewPopup extends ViewPopup { function CustomViewPopup() { parent::ViewPopup(); } function display() { global $popupMeta, $mod_strings, $custom_filter_gcm; parent::display(); } } Now to apply the filter we add some lines of code in the display function. require_once (‘include/MVC/View/views/view.popup.php’); class AccountsViewPopup extends ViewPopup { function CustomViewPopup() { parent::ViewPopup(); } function display() { global $popupMeta, $mod_strings, $custom_filter_gcm; /* We post the industry value as “Consulting” in an array. */ $_REQUEST[‘industry_advanced’] = array(‘Consulting’); parent::display(); } } If we observe the pop view of Accounts module, we will get records of Industry “Consulting”. And we are done. It’s that simple. If you have any such requirement and detail implementation help you can always contact us here.
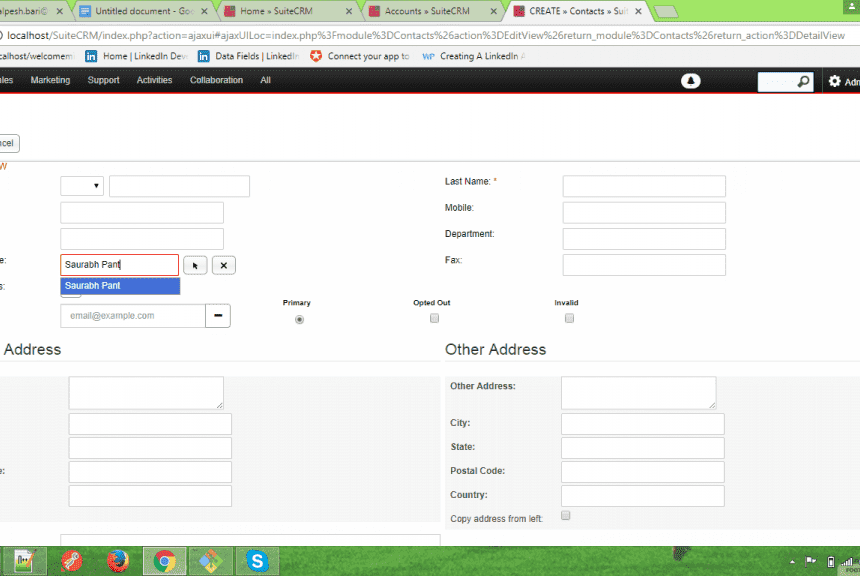
This article explains how to implement SugarCRM Custom Filter and why that’s required. Business Need for SugarCRM Custom Filter. SugarCRM contains huge data about the customer and related records.Many records are not required in day to day operations in SugarCRM. This records before problematic in creating and filtering new records and managing new clients in SugarCRM databases. Since SugarCRM Database is required through out the life cycle of organization it’s must to keep the records and ensure that they don’t become a hurdle in managing the day to day records in the CRM System. The best way to handle this is to create SugarCRM Custom Filter so that when the user opens the CRM and try to find out required records his search is limited to active records. How SugarCRM Custom Filter When we press a key in Relate field an ajax call is made through quicksearch.js Consider an Example “In Contact Module we have a relate field of accounts, we want to display only account other than type “Others”. You can have any condition over here like you can display accounts with type “Active”. Now when user starts typing account name , quicksearch.js makes an ajax call to Home module. Request sends the data as shown in the below code box. Here we have started typing the letter “S”. The request is sent to action quicksearchQuery and Module is “Home” “{“form”:”EditView”, “method”:”query”, “modules”:[“Accounts”], “group”:”or”, “field_list”:[“name”,”id”,”billing_address_street”,”billing_address_city”,”billing_address_state”,”billing_address_postalcode”,”billing_address_country”,”phone_office”], “populate_list”:[“EditView_account_name”,”account_id”,”primary_address_street”,”primary_address_city”,”primary_address_state”,”primary_address_postalcode”,”primary_address_country”,”phone_work”], “conditions”:[{“name”:”name”,”op”:”like_custom”,”end”:”%”,”value”:””}], “required_list”:[“account_id”], “Order”:”name”, “limit”:”30″, “no_match_text”:”No Match”}”, The action “quicksearchQuery” calls the file “QuickSearch.php” (modules\Home\QuickSearch.php), and as you see in the above data , the module is passed as “Accounts”. As per the standard coding practice, we create file QuickSearch.php in (\custom\modules\Home\QuickSearch.php). Copy to code of file (\modules\Home\QuickSearch.php) to file (\custom\modules\Home\QuickSearch.php) . Add following code in the file “custom/modules/Home/QuickSearch.php” Declare a new Constant in the Class /*——-New constant——-*/ const CONDITION_NOT_EQUAL = ‘not_equal’; /*——-New constant——-*/ In the “query”, function add the following line before this statement /*—-custom_filter—-*/ if (in_array(“Accounts”, $args[‘modules’])) { $args[‘conditions’][1] = array( ‘name’ => ‘accounts.account_type’, ‘op’ => ‘not_equal’, ‘end’ => ‘%’, ‘value’ => ‘Analyst’ ); $args[‘group’] = ‘AND’; } /*—-custom_filter—-*/ $args = $this->prepareArguments($args); // this already exist in your code In the function constructWhere() ad the following line of code in switch case /*——–new case————*/ case self::CONDITION_NOT_EQUAL: if ($condition[‘value’]) { array_push( $conditionArray, sprintf(“(%s != ‘%s’)”, $db->getValidDBName($condition[‘name’]), $db->quote($condition[‘value’])) ); } break; /*——–new case————*/ For more details and Implementation please contact us on here