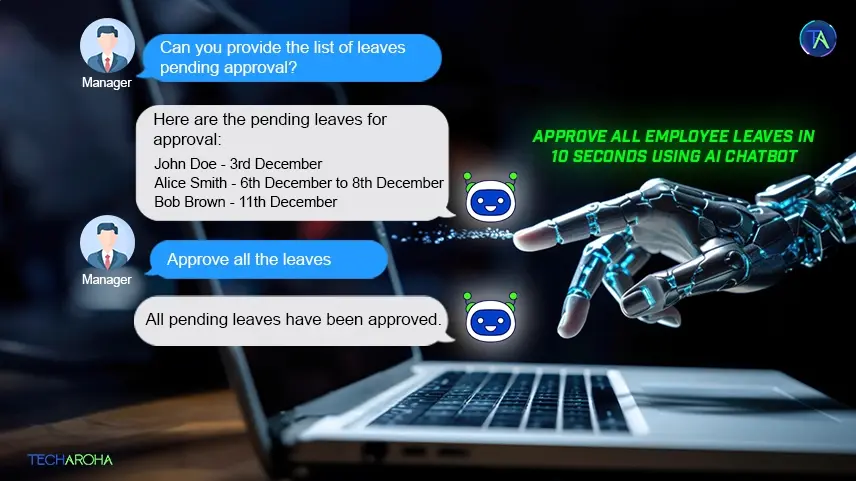
Managers often struggle with the time-consuming process of manually reviewing and approving employee leave requests. Techaroha’s AI Chatbot Integrated HRMS offers a solution that automates and streamlines this process. With our solution, managers can approve all employee leaves within seconds, enhancing productivity. Discover how AI chatbots can revolutionize leave management and save valuable time. What is HRMS (Human Resource Management System)? HRMS (Human Resource Management System) is a software solution designed to streamline and automate various HR functions in organizations. It centralizes employee data, payroll management, attendance tracking, leave requests, and performance evaluations. HRMS helps HR teams efficiently manage employee records, streamline administrative tasks, and improve communication across the company. By automating routine HR processes, HRMS ensures better accuracy, reduces manual effort, and enhances overall operational efficiency. This system is crucial in modern organizations, allowing HR professionals to focus on strategic tasks and improve employee experience while reducing the risk of errors. Challenges in Traditional Leave Management Systems These challenges not only reduce the overall efficiency of HR departments but also affect employee satisfaction and organizational productivity. How do AI chatbots transform HRMS for end users? AI Chatbot Integrated HRMS enhance efficiency, reduce human error, and streamline communication, making HRMS more user-friendly and effective for everyone involved. Key Benefits of AI Chatbot-Integrated HRMS for HRMS Creators and Providers AI chatbot integration can significantly boost profitability by enhancing product value, reducing costs, and attracting more clients to HRMS providers. Real-Life Example of AI Chatbot Leave Management Background: ABC HRMS, a leading HR management software provider used by over 100+ companies globally, faced challenges with the manual and time-consuming leave approval process. Managers had to process multiple leave requests daily, which slowed down decision-making and distracted them from more strategic tasks. The company wanted to improve operational efficiency and enhance the user experience for HR managers and employees. Solution: Techaroha integrated its AI-powered chatbot into ABC HRMS to automate the leave management process. The chatbot was designed to handle employee leave requests, process approvals, and provide real-time updates, streamlining the entire workflow. How AI Chatbot Integrated HRMS Made Things Easier: Outcomes: Techaroha’s AI chatbot integration helped ABC HRMS reduce time spent on leave management, improve communication, and streamline processes for both employees and managers. The solution enhanced productivity, reduced errors, and led to higher satisfaction, making the HRMS more attractive to other companies looking for efficient and modern HR solutions. In Conclusion Techaroha’s AI chatbot integration in HRMS revolutionizes leave management by making it faster, more efficient, and hassle-free for managers. This solution not only saves time but also improves productivity and employee satisfaction. Explore AI-powered HRMS solutions today to streamline your processes. For more information or a demo, visit Techaroha’s services.
Is your HRMS software struggling to keep up with user expectations? Imagine if it could predict what users need, make navigation a breeze, and boost its demand without extra effort. That’s the magic of AI! By transforming traditional HRMS systems into next-gen solutions, AI simplifies workflows, improves user experience, and sets your software apart from the competition. In this blog, we’ll show you how AI tackles common challenges, makes your HRMS stand out, and increases your profits. At Techaroha, we’ve done it for others, and it’s worked wonders. Ready to take your HRMS software to the next level? Let’s dive in! Why HRMS Needs to Evolve? Traditional HRMS software often struggles with several challenges that can make it difficult to stay relevant in today’s fast-paced business environment: The demand for innovative, AI-powered HRMS solutions is at an all-time high. Companies are looking for software that not only keeps up with modern trends but also enhances productivity and delivers a seamless user experience. To stay ahead in this competitive market, evolving your HRMS is no longer a choice—it’s a necessity. The Role of AI in Next-Gen HRMS Software Enhanced NavigationAI can completely transform how users interact with HRMS software. With predictive analytics, AI learns user behavior and anticipates needs, making navigation more intuitive and reducing time spent searching for information. Natural Language Processing (NLP) enables users to simply ask questions or make commands in natural language, bypassing complex menus. Combined with personalized user flows, AI ensures that each user’s experience is tailored to their role, improving efficiency and satisfaction. AutomationAI-driven automation takes over routine, time-consuming tasks, allowing HR professionals to focus on more strategic activities. For example, AI can automatically manage attendance by detecting patterns, flagging discrepancies, and sending reminders. It can streamline leave approvals by assessing requests based on company policies and historical data. Additionally, AI simplifies payroll by automatically calculating wages, deductibles, and tax compliance, ensuring accuracy and saving time. Decision SupportAI empowers HR leaders with actionable insights derived from data, enabling them to make better, data-driven decisions. Whether it’s identifying talent gaps, predicting employee turnover, or optimizing compensation strategies, AI provides real-time analytics to guide decision-making. By analyzing trends and performance metrics, AI helps HR teams anticipate future challenges, improve workforce planning, and implement strategies that support business growth. With AI, HRMS software becomes smarter, more efficient, and increasingly capable of meeting the demands of a modern workplace. 5 Reasons to Make Your HRMS Software Next-Gen 1. Boosts Efficiency and Saves TimeOutdated systems slow down HR processes, but a next-gen HRMS powered by AI can automate routine tasks like attendance tracking, leave approvals, and payroll. This can save up to 30% of HR teams’ time, allowing them to focus on strategic initiatives. Faster processes mean happier clients and a competitive edge. 2. Enhances User Experience with Smarter NavigationDid you know that 88% of users are less likely to return to a system with poor usability? A next-gen HRMS offers intuitive navigation through features like AI-driven search and personalized user flows. Happy users mean better adoption rates and long-term client retention. 3. Increases Market Demand and RevenueBusinesses are willing to pay more for advanced HRMS solutions that deliver real results. Studies show that AI-enabled HR systems can increase market demand by up to 45%. Integrating next-gen features ensures your software stands out, leading to more sales and higher profits. 4. Future-Proofs Your SoftwareWith modern workplace trends like remote work and hybrid teams, HRMS software must evolve. A scalable, AI-powered HRMS adapts to these changes, ensuring relevance in a rapidly changing market. This keeps your clients loyal and positions you as an industry leader. 5. Provides Data-Driven Insights for Better DecisionsAI can analyze vast amounts of HR data to provide actionable insights. For example, predictive analytics can identify talent gaps or flag potential turnover risks. Companies that leverage such insights see a 20% improvement in workforce planning and operational efficiency. By making your HRMS software next-gen, you not only meet current needs but also position yourself for long-term success in a growing market. Case Studies or Examples One of our success stories at Techaroha involves helping ABC Software Company integrate an AI-powered chatbot into their HRMS. This chatbot allowed employees to quickly check their remaining leaves by simply asking, and managers could instantly access a list of pending leave approvals. The result? Significant improvements in user adoption—employees found the system intuitive and easy to use, while managers experienced a faster approval process, saving valuable time. By incorporating AI, the HRMS became not only more efficient but also more user-friendly, which led to a boost in market demand. Other companies in the industry quickly took notice of the enhanced functionality and ease of use, helping ABC Software stay ahead of competitors. This example demonstrates how integrating AI into HRMS can streamline operations, improve user experiences, and increase demand for the software in a highly competitive market. How to Get Started? Integrating AI into your HRMS software doesn’t have to be overwhelming. Here are practical steps to get you started: Why Techaroha Is Your Partner for AI-Powered HRMS Development? Techaroha has extensive experience in creating innovative, AI-driven systems tailored to meet business needs. Our team specializes in: With a proven track record of delivering results, we ensure your HRMS evolves into a next-gen solution that stands out in the market. Conclusion AI is the key to transforming HRMS software into a next-gen solution that businesses can’t resist. By integrating AI, you’ll simplify workflows, enhance user satisfaction, and stay ahead of the competition. Ready to take the first step? Let Techaroha help you bring your vision to life!

Generative AI is revolutionizing business by creating content, designs, and solutions through advanced algorithms. Its significance in today’s business landscape lies in its ability to enhance creativity, efficiency, and personalization. This blog explores what Generative AI is, how it works, its business applications, benefits, challenges, and future trends. What is Generative AI? Definition of Generative AIGenerative AI refers to a class of artificial intelligence that can create new content, such as text, images, audio, and video, by learning patterns from existing data. Differences between Generative AI and Traditional AITraditional AI operates based on analyzing data and making predictions or decisions. It excels in classification tasks, such as identifying objects in images or translating languages. Generative AI, on the other hand, goes a step further by generating new data that resembles the training data. While traditional AI can tell you what is in an image, generative AI can create entirely new images from scratch. Examples of Generative AI Applications How Generative AI Works? Generative AI operates on basic principles of pattern recognition and creation using advanced algorithms. At its core, it relies on neural networks and deep learning techniques to learn from vast amounts of data and generate new content that mimics this data. Neural Networks and Deep LearningNeural networks, inspired by the human brain, consist of interconnected layers of nodes (neurons) that process input data. Deep learning, a subset of machine learning, involves training these neural networks on multiple layers to capture intricate patterns and representations in the data. Training Process for Generative Models Types of Generative AI Models Key Business Applications of Generative AI Generative AI revolutionizes several key business functions: These applications illustrate how generative AI augments creativity, efficiency, and customer-centricity, driving competitive advantage and fostering innovation across industries. Benefits of Generative AI for Businesses Generative AI offers substantial benefits to businesses: Efficiency and Cost Savings: Automates repetitive tasks like content creation and data analysis, reducing human resource costs and operational inefficiencies. Enhanced Creativity and Innovation: Generates novel solutions and designs, fostering innovation in product development and marketing strategies. Improved Customer Experience and Personalization: Creates personalized interactions through chatbots and tailored content, enhancing customer satisfaction and loyalty. Scalability of Operations: Scales operations seamlessly by handling increasing volumes of data and tasks without proportional increases in resources, supporting business growth and agility. Challenges and Considerations of Generative AI Generative AI presents significant challenges and considerations for businesses: Case Studies and Success Stories: Generative AI in Action Generative AI is no longer science fiction. Companies across industries are embracing this technology to drive innovation and achieve impressive results. Here are a few examples: 1. Personalized Marketing with Adobe: 2. Drug Discovery with Generative AI by Insilico Medicine: 3. Automating Fashion Design with Zalando: 4. Generating Realistic Product Mockups with Autodesk: 5. Content Creation for Social Media with Buzzfeed: Future Trends in Generative AI Emerging Technologies and Advancements: Generative AI is rapidly advancing with breakthroughs in reinforcement learning, transformer models, and multimodal AI that processes and generates text, images, and audio simultaneously. Quantum computing is set to enhance AI efficiency and capabilities, enabling faster training and more complex generative tasks. Predictions for Future Impact on Business: Generative AI will revolutionize industries by automating creative processes like product design and marketing, allowing businesses to create hyper-personalized customer experiences and streamline operations. Enhanced AI-driven decision-making tools will offer deeper insights and predictive analytics, transforming strategic planning. As AI integration deepens, ethical AI development and deployment will become critical, influencing regulatory landscapes and corporate governance. These trends suggest a future where generative AI not only boosts human creativity and productivity but also drives significant economic and societal changes, requiring businesses to adapt proactively. Getting Started with Generative AI in Your Business Steps to Integrate Generative AI: Generative AI holds immense potential to transform business operations, enhance creativity, and drive innovation. By automating content creation, optimizing marketing, and personalizing customer experiences, it offers significant competitive advantages. We encourage you to explore and adopt generative AI technologies to stay ahead in the evolving digital landscape. Embrace these advancements to unlock new opportunities and propel your business forward with Techaroha’s expertise.